Desserts

Vegan Churro Ice Cream Sandwiches

Vegan Vanilla and Chocolate Churro Ice Cream Sandwiches

If you are a fan of churros and ice cream, then we have the perfect dessert for you! On a recent trip to Walt Disney World we saw someone walking around with a churro ice cream sandwich, and we instantly knew what we would be making once we got home! Mickey never fails us! I mean its genius really, and I am not sure why we didn’t think of it ourselves. Deliciously creamy vegan ice cream, sandwiched between crispy, chewy, perfectly fried cinnamon-sugar-coated vegan churros. Nothing not to love here…nothing! You can use any ice cream you like. We used almond milk chocolate and vanilla. I honestly can’t say which is my favorite, so I just ate one of each! You can also freeze these tasty treats for later, so don’t worry about trying to eat them all at once, but if I am being perfectly honest, that wouldn’t be hard either! So this summer, step up your ice cream sandwich game with vegan churros! I don’t think you will be sad that you did.

INGREDIENTS:

  • 4 cups all purpose flour

  • 1/4 cup vegan butter, room temp

  • 1 teaspoon salt

  • 1/4 cup sugar

  • 2 cups water

  • neutral oil for frying (we use grapeseed oil or canola oil)

  • 1 cup sugar plus 2 tablespoons cinnamon (this is for coating the fried churros)

  • Plant based ice cream. (we used vanilla and chocolate)

INSTRUCTIONS:

  1. Heat a medium size pot over medium heat. Add the water, sugar, and salt. Cook unit the sugar has dissolved.

  2. Add in the butter and let it melt in the water mixture. Remove from heat.

  3. Stir in the flour and mix until well combined.

  4. Add the mixture to a piping bag fitted with medium to large star tip. If you do not have a piping bag or star tip, you can add the batter to a zip lock bag and snip a tiny piece of the corner.

  5. Add 1 cup of sugar and 4 teaspoons of cinnamon to a small bowl and set aside.

  6. Heat a few inches of oil in a deep skillet or pot. You need enough oil that the churros can float in the oil, and not hit the bottom of the pot. You want the temperature of the oil around 350 - 375 degrees. If you do not have a candy thermometer for testing the oil temperature, you can poke a chop stick or wooden skewer into the oil. If bubbles form around the chop stick, it’s ready. You can also just let it heat for several minutes, and try a little dough at first before trying a whole churro.

  7. Line a baking sheet with some paper towels and place a wire cooling rack on top.

  8. Once the oil is ready, pipe a circle by making a swirl with the batter. I like to do 2 at a time so I can try and get them an equal size. Allow they churros to fry on each side for about a minute or until they are golden brown. Place finished churros on the wire rack to cool for a minute. Once they are cool enough to handle, coat the churros in the sugar and cinnamon mixture.

  9. Once churros are completely cool, make sandwiches by adding a scoop of plant based ice cream or homemade nice cream between two churros. Serve right away or you can freeze these sandwiches for later. You just have to let them sit at room temperature for a few minutes to allow the churro to thaw enough to bite through!

Serves 6 - 8 depending on the size you make your churros.

If you like this recipe, try these:

Nostalgic Vegan Ice Cream Cake (Dairy Queen)

Vegan Banana Pudding Milkshake

Chocolate, Peanut butter, Banana Nice cream

Vegan Chocolate Churro Ice Cream Sandwich

Step up you ice cream sandwich game with these delicious vegan churro ice cream sandwiches. Summer just got a lot tastier.

Vegan Lemon Cupcakes with Cream Cheese Frosting

A spread of delicious vegan lemon cupcakes with cream cheese frosting garnished with candied lemons.

Lemon and cream cheese might be one of my favorite dessert combos. So this year for my 40th birthday, my super talented 13 year old daughter and I decided to whip up a batch of vegan lemon cream cheese cupcakes. They are so delicious and just about perfect as far as I am concerned. Soft lemony cake with zesty vegan cream cheese frosting, and a little wedge of candied lemon on top! If you love lemon and cream cheese together as much as I do, then you can not go wrong with these cupcakes! If you are no into candied citrus then you could top these with some sprinkles or a piece of lemon candy. I personally love candied lemon slices, so for me it’s the “cheery “ on top…err the lemon on top. You know what I mean!

INGREDIENTS:

  • 3 cups all purpose flour

  • 2 cups white sugar

  • 1 1/2 teaspoons baking powder

  • 1 teaspoon baking soda

  • 1/2 teaspoon salt

  • 2/3 cups lemon juice (about 4 lemons)

  • zest from 2 lemons

  • 2 cups plant milk (I like to bake with oat milk)

  • 1/2 cup melted vegan butter

  • 1 teaspoons vanilla extract

  • Candied lemon slices (optional garnish)

Lemon Cream Cheese Frosting:

  • 1/2 cup vegan butter

  • 1/2 cup vegan cream cheese

  • 5-6 cups powdered sugar

  • zest from 1 lemon

A line of delicious vegan lemon cupcakes with cream cheese frosting garnished with candied lemons.

COOKING INSTRUCTIONS:

PREHEAT OVEN TO 350 DEGREES

  1. In a large bowl, whisk together dry cake ingredients. In a smaller bowl, whisk together the wet ingredients.

  2. Combine the wet ingredients into the dry and mix until well combined.

  3. Line a muffin tin with 24 cupcake liners. We actually have a tin that holds 2 dozen cupcakes, but if yours holds 1 dozen, you will need to bake in batches.

  4. Fill the cups 3/4 of the way full. Bake for 25 to 30 minutes or until a toothpick inserted in the middle of one of the cupcakes comes out clean.

  5. Allow the cupcakes to cool completely.

  6. In a stand mixer, or using a hand mixer, cream together the butter and cream cheese. Add in the vanilla and lemon zest. Begin adding the powdered sugar a little at a time and beat it in until the frosting is the desired stiffness.

  7. Pipe or spread frosting onto cooled cupcakes and garnish with a wedge of candied lemon.

Serves 24.

If you liked this recipe, then try these:

Vegan Lemon Pound Cake

Vegan Lemon Lavender Cream Cheese Pop Tarts

Blueberry Pancakes with Sweet Lemon Ricotta

A closeup of delicious vegan lemon cupcakes with cream cheese frosting garnished with candied lemons.

Lemon and cream cheese is a classic combination and these vegan cupcakes highlight these flavors so perfectly.

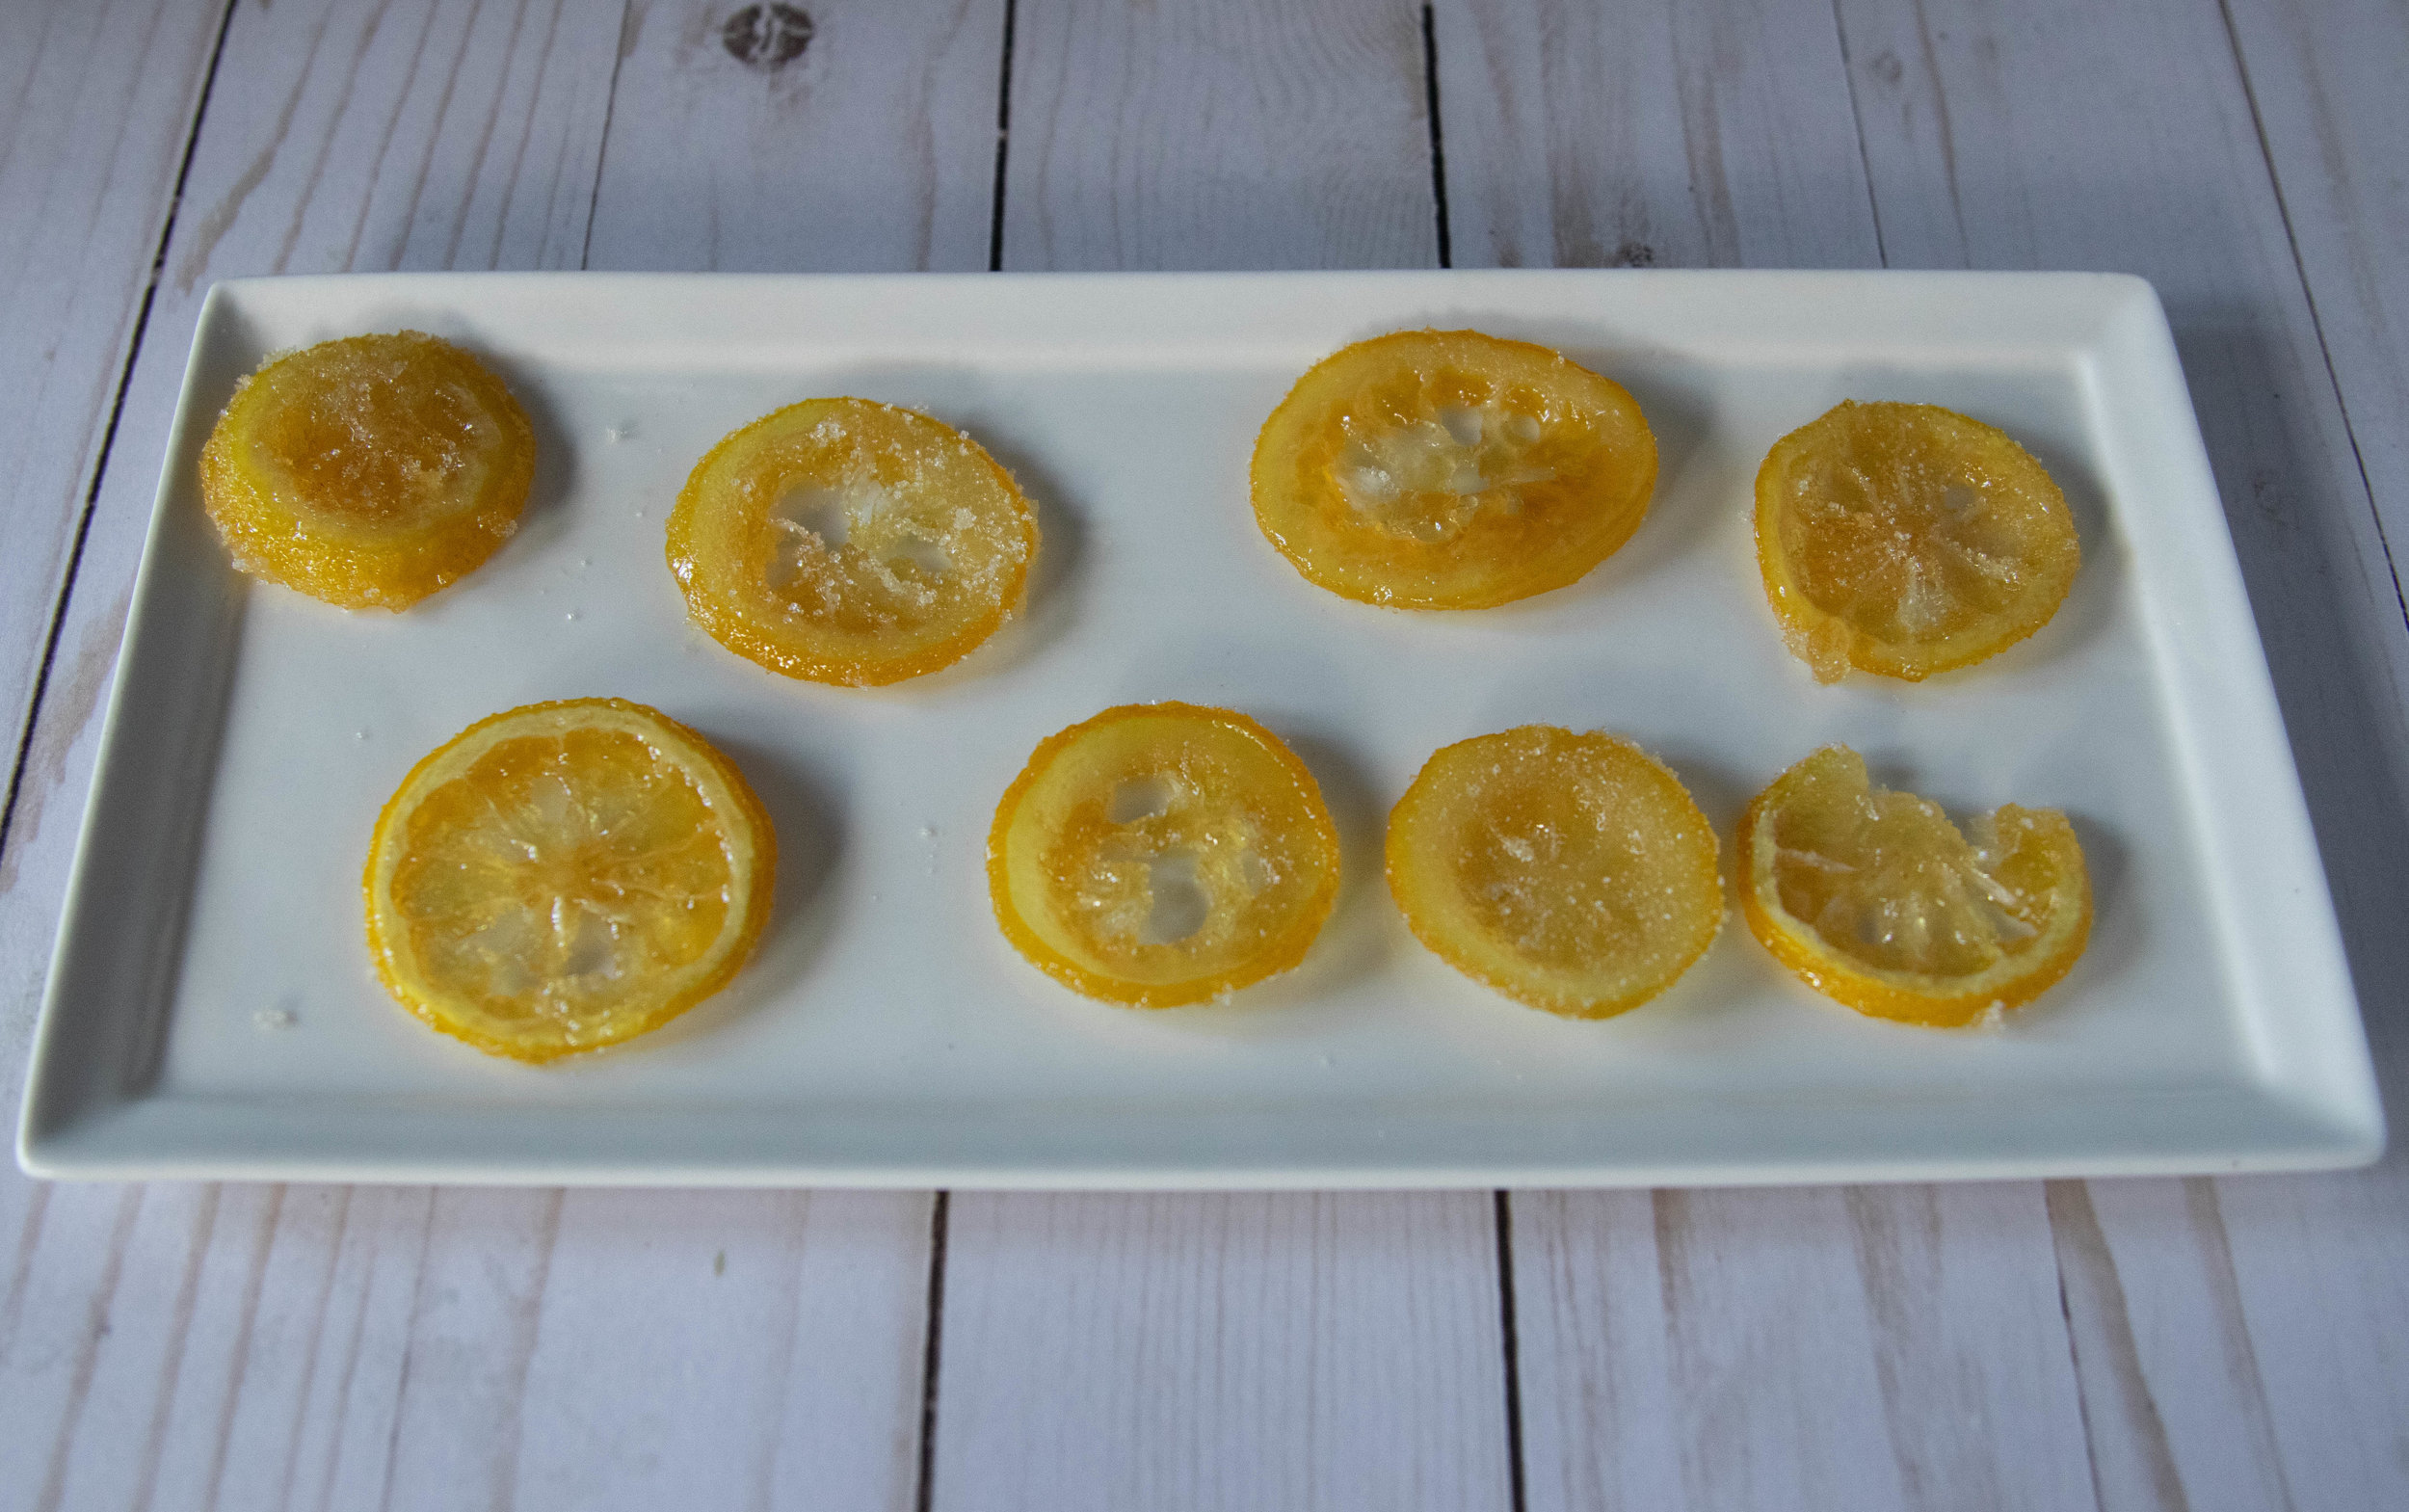
Easy Candied Lemons

Plate of candied lemons with granulated sugar.

When I think of summer, I think of citrus fruit. We live in Florida so there is an abundance of lemons, limes, and oranges growing in our own neighborhood. A lot of citrus is actually ripe in the winter months, but that does not change my craving for all things citrus once the temperatures rise. Candied citrus is no exception. Candied lemons are the perfect easy garnish for cakes, cupcakes, cocktails, or even as a snack. You could just as easily candy limes or orange slices as well. Be sure to allow the candied lemons plenty of time to cool. They will stay a bit sticky but be firm enough to cut into smaller pieces once they are cooled and set.

INGREDIENTS:

  • 2 lemons, sliced thinly

  • 1 cup refined sugar (plus more for sprinkling)

  • 2/3 cups water

COOKING INSTRUCTIONS:

  1. Add water and sugar to medium sized pot over medium heat. Bring to a simmer and whisk until the sugar has dissolved.

  2. Remove any seeds from the lemon slices and add them to the water and sugar mixture. Allow the lemons to simmer for about 15 minutes.

  3. Remove lemons from the water sugar mixture carefully, using a pair of tongs and transfer them to a parchment lined cookie sheet. Sprinkle with extra sugar.

  4. Let the lemons cool at room temperature until completely cool. Store in the fridge in an air tight container.

Candied lemons are the perfect easy garnish for cakes, cupcakes, cocktails, or even as a snack.

Chocolate Coconut Macaroon Smoothie (With Matzah Toffee)

IMG_2417.jpg

Sometimes I want a healthy smoothie with a side of not so healthy matzah toffee. I mean, I am gonna feel a whole lot less badly about drinking this than I am an actual milk shake!!

And that little bit of matzah toffee on the side gives me just enough guilty pleasure without totally wrecking an otherwise healthy and filling shake! This my friends is what we call balance.

Feel free to skip the matzah toffee. I tend to make this shake at passover when I have matzah toffee laying around.

The smoothie is still delicious without it! Its quick and easy with just the right amount of sweetness. Drop some protein powder in it, and call it breakfast, lunch, or dinner!


NGREDIENTS:

  • 2 cups coconut or almond milk

  • 2 cups ice

  • 1/4 cup cashews

  • 3 tablespoons dark cocoa powder

  • 5-6 pitted dates

  • 3 tablespoons shredded coconut (more if you like)

  • Optional: 2 tablespoons agave, if the dates have not made it sweet enough for you

  • optional: 1 to 2 scoops vanilla protein powder

  • Optional: A few pieces of matzah toffee for garnish


INSTRUCTIONS:

  1. Add all of the ingredients to a blender and mix until smooth. You can add the dates before adding any agave and taste it to see if its sweet enough. When I make this for myself, I think the dates make it plenty sweet. When I make it for my family they beg to differ, so I always have to add a few squirts of agave. Just adjust according to your own taste. If you are using protein powder and it is sweet, then that may do it as well.

  2. Divide between 2 large glasses or 3 smaller glasses, and garnish with more shredded coconut or a few pieces of broken up Matzah Toffee. If making fresh matzah toffee for the recipe, you can sprinkle it with shredded coconut instead of sprinkles.

Vegan Chocolate Toffee Matzah

IMG_2450.jpg

If you celebrate Passover then you probably already know all about matzah toffee, otherwise known as matzah crack.

I mean if you have to eat matzah for a week, you gotta get creative! I don’t hate matzah. I am however 100% over eating it after a week.

I don’t hate it, lets say I tolerate it. BUT when you pour butter, sugar, chocolate and sprinkles all over it, I FLIPPING LOVE IT!

Suddenly Passover is the best time of year. So much for feeling afflicted!

You may have also had something like this made with saltine crackers, but I promise, PROMISE, it is better on thin, crispy, light matzah!

So even if you do not celebrate passover, you can still grab a box of matzah in the international isle of your local grocery store and make yourself a batch of this yearly favorite. And if you by some chance get invited to a Passover Seder, now you know what to make!


INGREDIENTS:

  • 5 pieces of plain matzah (you can use regular or Gluten Free)

  • 3/4 cups dairy free butter (I use earth balance)

  • 1 cup brown sugar

  • 1 cup chopped vegan dark chocolate, or chocolate chips

  • course sea salt

  • sprinkles (optional)


INSTRUCTIONS:

Preheat oven to 350 degrees.

  1. In a medium sauce pan, heat brown sugar and butter over medium heat, stirring continuously. Simmer for 3 to 5 minutes, allowing all of the sugar to melt, and the mixture to become smooth.

  2. Cover a large cookie sheet in a layer of parchment or foil (this makes for easier cleanup.) Make a single layer of matzah on the pan. You may have to break a piece in half to fit it all on one pan, or you can use 2 pans.

  3. Evenly spread the sugar/ butter mixture over the pieces of matzah. You want to completely cover each piece with the mixture . Place the pan in the oven on the middle rack. Allow the matzah to bake for about 5 minutes.

  4. Remove matzah from the oven, leaving it on the pan. Sprinkle the tops of the hot matzah with the chocolate. It will quickly melt. Evenly spread the melted chocolate over the matzah. Sprinkle with salt and sprinkles.

  5. Place the pan in the fridge or the freezer to cool, and allow the chocolate to harden.

  6. Once the matzah has hardened, either cut into bite size pieces with a knife, or break into pieces with your hands. Store in an airtight container in the fridge, or at room temperature.

1.jpg

Nostalgic Vegan Ice Cream Cake (Dairy Queen)

2.jpg

Every year when I was a kid I hoped and wished my parents would get me a Dairy Queen classic ice cream cake for my birthday.

I think I got a few over the years, but would have happily eaten that cake every day of my life.

A fudgy cookie bottom, chocolate ice cream, more fudge, vanilla ice cream, coved in frozen whipped topping.

It’s every ice cream lovers dream, and nobody did it like the Dairy Queen.

Recreating a vegan version of this ice cream cake is actually really simple, but it will take some time. If you want it for dessert then start it in the morning or if you want it for an afternoon birthday party, prepare it the night before.

Sometimes you just cant rush perfection, or make ice cream freeze faster than it wants to in this case.

If you have never experianced the joy and bliss of this DQ wonder, then I am truly sorry, but hey, now you can try it in all of it’s vegan form and glory!

Does this make me the Vegan Dairy Queen?? Just let me dream, Y’all!


INGREDIETS:

  • 3 pints non dairy vanilla ice cream

  • 1 pint non dairy chocolate ice cream

  • 1 regular sized package of chocolate cream filled sandwich cookies

  • 2 cups vegan fudge sauce (recipe below)

  • 2-3 cups Sweet Aquafaba Whip

  • optional: vegan sprinkles

VEGAN FUDGE SAUCE:

  • 1/3 cup coconut oil

  • 3 tablespoons white sugar

  • 1/2 cup light corn syrup

  • 1/3 cup dark cocoa powder

  • 1 cup chopped vegan dark chocolate or chocolate chips

  • 3/4 cups full fat coconut milk

  • 1 teaspoon vanilla extract


INSTUCTIONS:

  1. Start by letting the chocolate ice cream sit out on the counter to soften while you prepare the fudge.

  2. Make the fudge sauce by adding all of the ingredients minus the chopped chocolate and vanilla to a medium sauce pan over medium/low heat. Allow the mixture to come to a simmer for about 5 minutes, stirring continuously, allowing the mixture to thicken. Remove from heat.

  3. Stir in the chopped chocolate and vanilla, and continue stirring until all of the chocolate has melted. It should be thick and glossy. Set aside.

  4. Crush up the entire pack of sandwich cookies. You can put them into a food processor and pulse until they are nice and crushed, or you place them in large zip lock and roll over them with a rolling pin, or crush them using a kitchen mallet.

  5. Place crushed cookies in a large bowl and stir in one cup of the chocolate fudge (the recipe makes 2 cups of fudge so just use half)

  6. Line the bottom of a 9 inch inch spring form pan with a circle of parchment paper. Take half of the cookie mixture and press it evenly into the bottom of the spring form.

  7. Empty the chocolate ice cream into a medium size bowl and stir it until it is nice and smooth. You dont want it totally melted, you want it the consistency of soft serve so it will spread evenly.

  8. Spread the chocolate ice cream evenly over the chocolate cookie bottom and pop the pan in the freezer for 20-30 minutes to let the ice cream firm back up.

  9. Take the vanilla ice cream out of the freezer and let it soften up.

  10. Remove pan form the freezer and, spread the remaining cookie mixture evenly over the chocolate ice cream. Pour the remaining 1 cup of fudge over the cookie mixture and spread evenly as well. Pop pan back in the freezer for 10-15mintues

  11. Dump all three containers of vanilla ice cream into a large bowl and stir them up until they are also creamy and smooth like soft serve.

  12. Spread the vanilla ice cream evenly over the fudge layer and place back in the freezer so the whole cake can refreeze and firm up. You can press on the cake in the center to see if it seems frim after about 3 or 4 hours. If not, let it stay in the freezer for another hour or until the center seems nice and frozen.

  13. While the cake is freezing, prepare the Sweet Aquafaba Whip. Once the cake seems frozen through, remove from the spring form pan. Coat the entire cake in a thick layer of the whip. You can pipe stars along the rim and add sprinkles if you like. Pop the cake back into the freezer for about an hour to let the whip firm up.

  14. To serve, fill a tall glass with hot water and drop a sharp knife into the glass for a few minutes. Dry off the knife and cut the cake. The hot knife will cut more easily through the frozen cake. Store any leftovers back in the freezer.

IMG_2372.jpg

Easy Vegan Chocolate Fudge

When I was a kid, we spent countless weekends camping out in the North Ga Mountains. By camping I mean sleeping comfortably in an RV right outside of the tourist town of Helen, Ga. It’s a cute little mountain town that looks like an old Bavarian vil…

When I was a kid, we spent countless weekends camping out in the North Ga Mountains.

By camping I mean sleeping comfortably in an RV right outside of the tourist town of Helen, Ga. It’s a cute little mountain town that looks like an old Bavarian village.

Growing up the shops ranged from things like candle making, local jewelry, outlets, a cool/creepy wax museum, and the fudge shop!


My dad always let me get fudge and it was the thing I looked forward to the most. Fast forward 20 something years and we recently went back to take our own kids. Neeless to say, the architecture hasn’t changed, but the shops and crowds certainly have. It’s still charming and fun to visit, but It wasn’t the Helen of my childhood. Time keeps on moving I guess, and people no longer want swirly, hand dipped, wizard and dragon carved candles? What?!?! I was genuinely surprised by this?


I was able to get ridiculous matching airbrush t-shirts with one of my favorite old friends, but otherwise it was sort of a let down. Also, now that we are vegan, I couldn’t share the joy of choosing a slab of fudge with my kid.

So what’s a girl to do, other than go home and make her kids some vegan fudge, and assure them that back in the day, Helen was once one of her favorite places on earth. An amazing place I spent summers floating down the Chattahoochee river on inner tubes, watching candles get carved, and eating enough fudge to make you sick.


I just hope we can give our kids memories like this, and find our own places that they hold dear in their hearts, even if they change over time. And I assure you every time I make a batch of vegan fudge, I will remember Helen like it was when I was a kid, and it will make my heart happy. So, now where can a girl get a swirly, glittered, hand carved wizard candle?

INGREDIENTS:

  • 4 1/2 oz vegan dark chocolate

  • 1 can full fat coconut milk or cream

  • 1/2 cup sugar

  • 1/4 cup peanut, almond, or sunbutter

  • pinch of salt

  • 1/4 cup chopped walnuts (optional)

INSTRUCTIONS:

  1. Chop the dark chocolate into small pieces.

  2. Add chocolate, sugar, and coconut milk to a medium sauce pan. Heat over medium/low heat, allowing the the chocolate to melt, and the mixture to come to a simmer. Let the mixture simmer for about 5-7 minutes, stirring continuously. Stir in the peanut butter and allow it to melt. Add the pinch of salt.

  3. Line an 8x8 baking dish with parchment paper. Pour the fudge mixture into the pan.

  4. Top with walnuts if you like, then allow the fudge to chill uncovered in the fridge for about 4 hours to firm up.

  5. Cut and serve fudge. Store leftovers in an airtight container in the fridge.

IMG_2234.jpg

Matcha White Chocolate Peanut Butter Cups (vegan)

For years I have searched for a plant based version of those little mini coffee creamers to carry in my purse. You know, for all of those times that there was not a non dairy creamer option, and my choices were black coffee or no coffee at all! The …

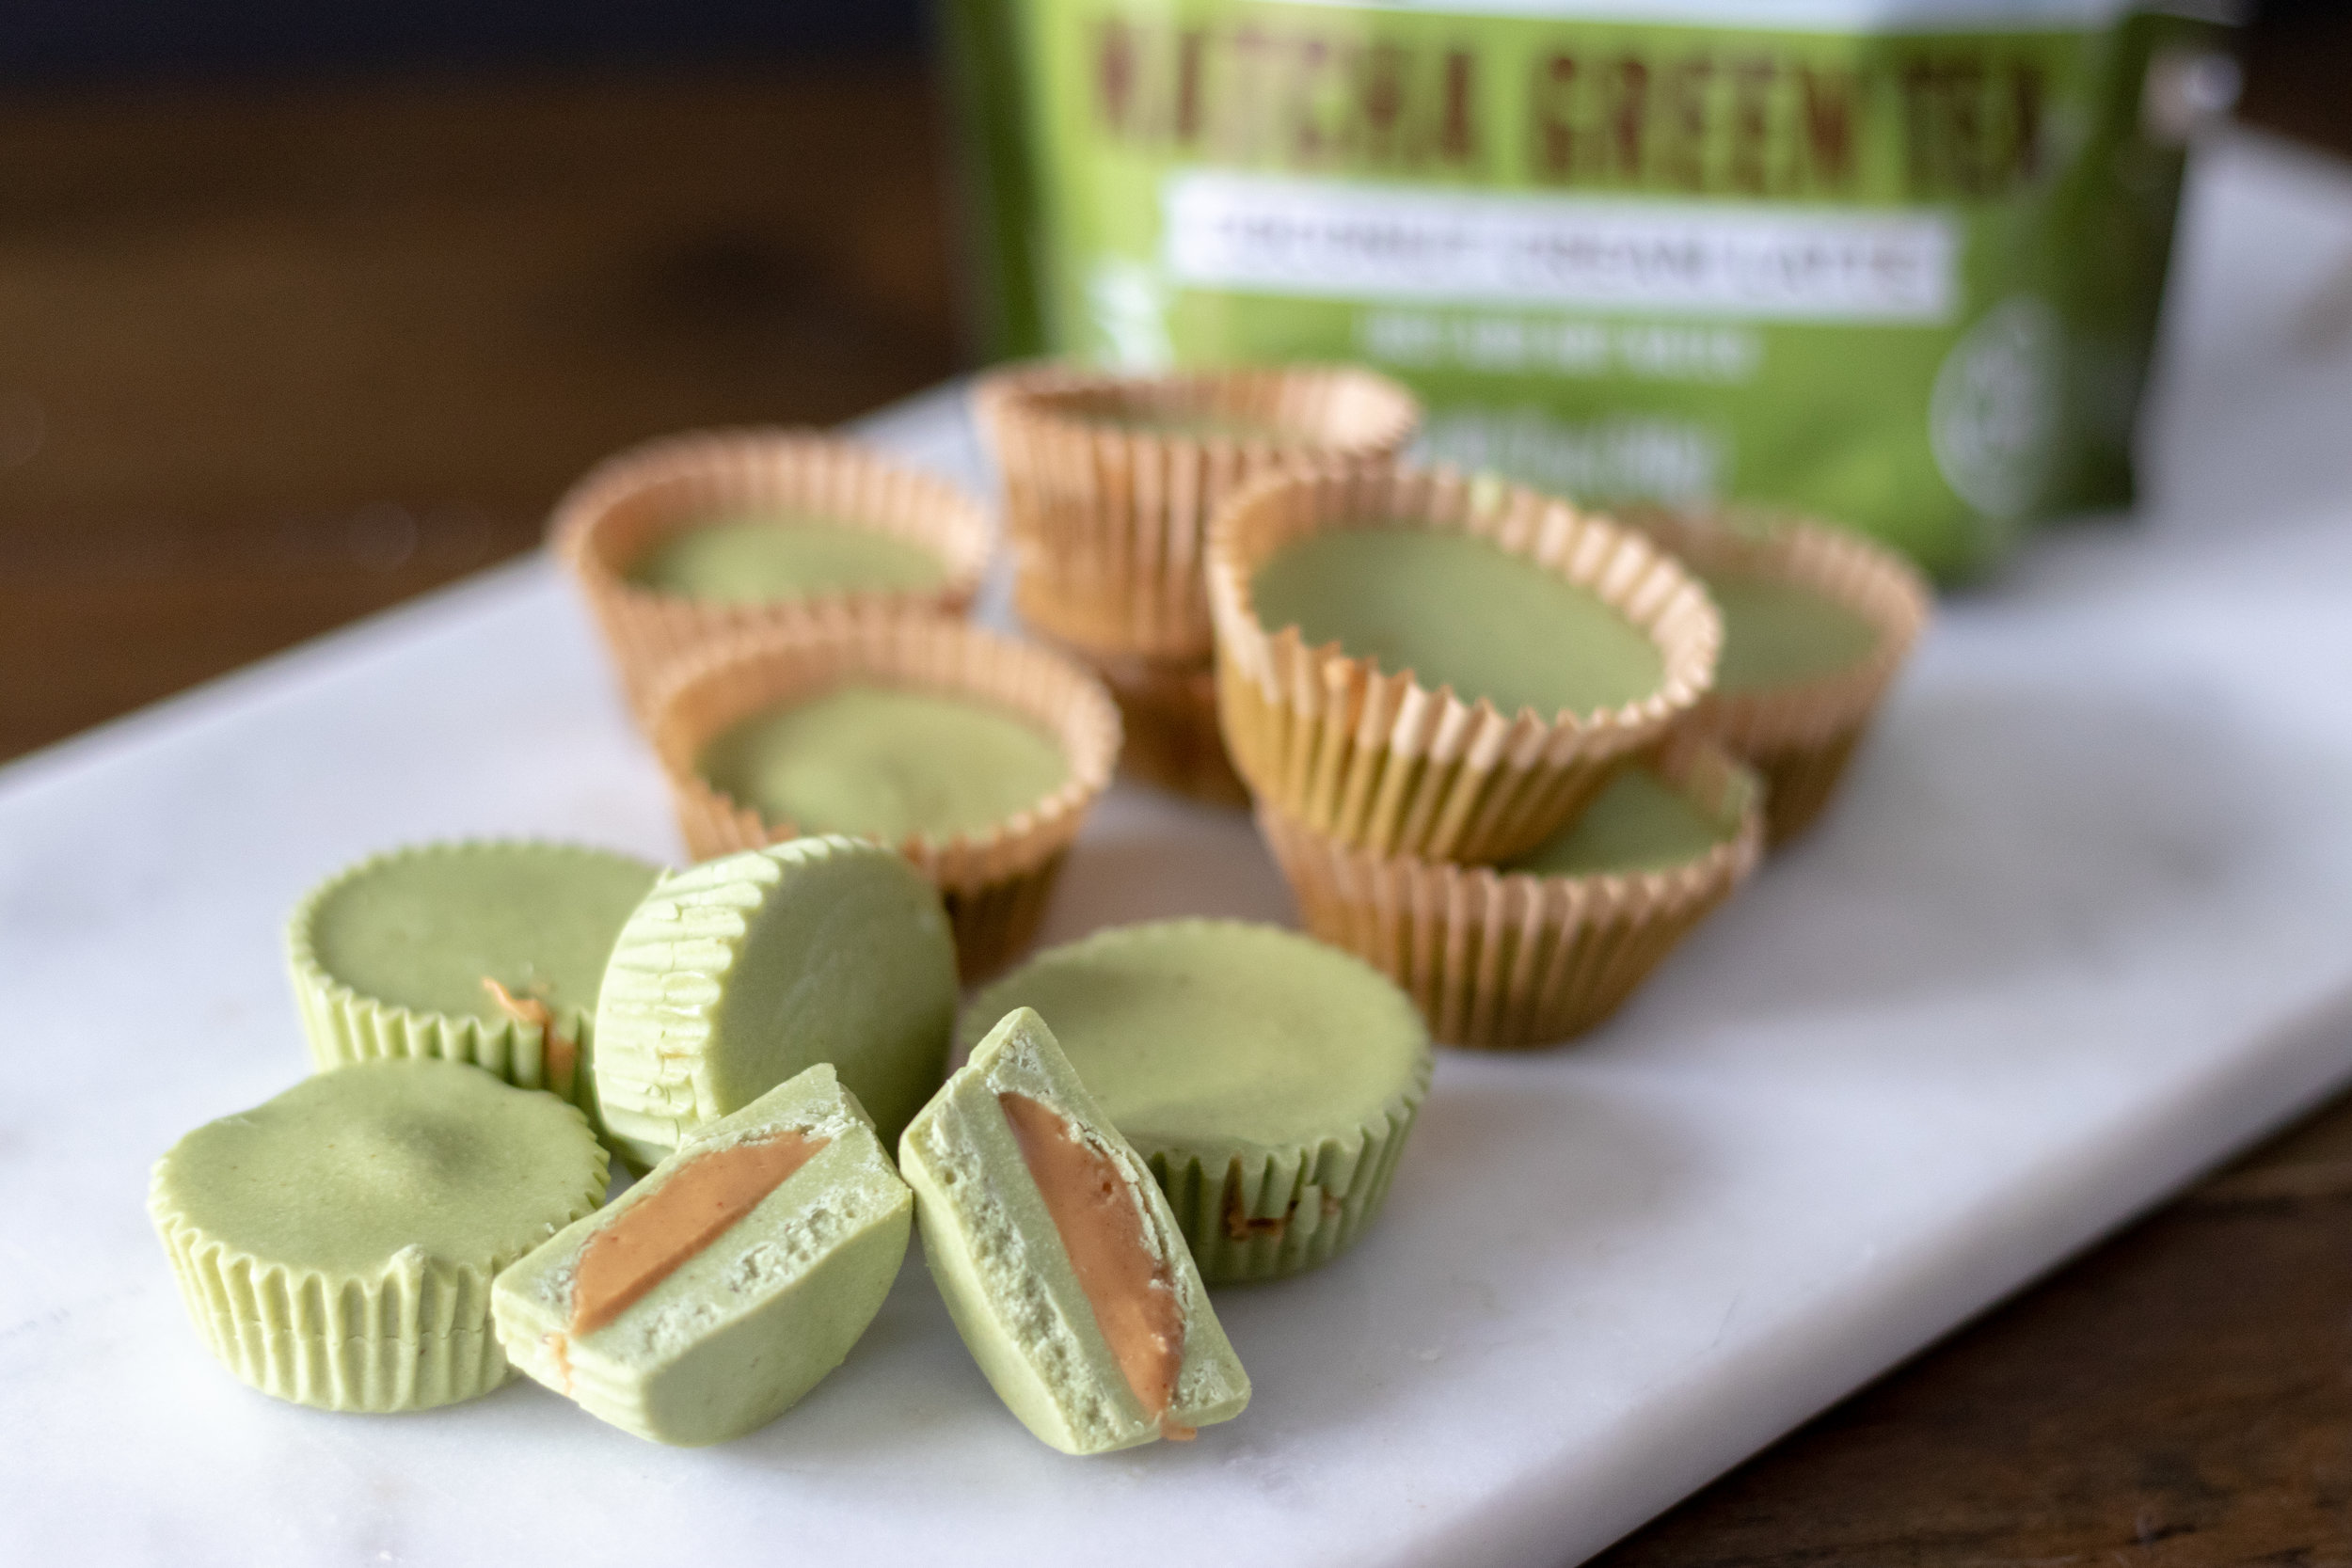
For years I have searched for a plant based version of those little mini coffee creamers to carry in my purse. You know, for all of those times that there was not a non dairy creamer option, and my choices were black coffee or no coffee at all! The horror! I always wondered why this didn’t seem to be a thing until I recently discovered that it is! I found powdered coconut vegan coffee creamer, and they even have single serving packets! You heard me correctly! The company is called Coconut Cloud. One of the things I love best about this company outside of product itself, is that they are an all female company (sorry guys, I’m a lady and I am all about lady ran businesses that make cool products). All of their products are made in the US, and are dairy free, lactose free, gluten free, GMO free, soy free, and VEGAN! Pretty cool, huh? I was able to try the original coconut creamer, and the Matcha Green Tea Coconut Cream Latte. We are big matcha fans in this house, so I was most excited about this drink mix. Just add hot water ,and you have yourself a delicious, and easy, green tea latte in seconds! It is super convenient, more affordable, and way healthier than a lot of coffee shop options. There are only about 4 ingredients in the mix, and you can pronounce and recognize each one! Hooray for real, healthy ingredients. But what is even better is that you can use the mix in other ways. We used the Matcha mix to make these delicious little matcha white chocolate peanut butter cups! Who says you can’t have your drink mix and eat it too! If you are a fan of matcha and peanut butter cups, then I promise you will love these easy little treats! And if you have been looking for a great vegan powdered creamer, or an easy, coconut based vegan drink mix, then check out all of the coconut based creamer, lattes, and cocoa mixes Coconut Cloud has to offer!

INGREDIENTS:

* you will need 12 mini cupcake liners for this recipe and a muffin tin

INSTRUCTIONS:

  1. Add the white chocolate chips and coconut oil to a microwave safe bowl. Microwave in 30 second intervals, stirring in between until the chocolate has completely melted.

  2. Stir in 1/3 cup of the Matcha Green Tea Latte powder and a pinch of salt with the melted chocolate.

  3. Place cupcake liners in a muffin tin. You can use a mini, or a full size muffin tin. This just helps to keep the liners in place. Fill each liner about 1/3 full with the white chocolate matcha mix. Place the muffin tin in the freezer for a few minutes to harden the chocolate.

  4. While the chocolate is in the freezer, put the 2 tablespoons of peanut butter in a microwave safe bowl. Microwave for 30 seconds. Stir well. This just helps to soften the peanut butter and makes it easier to manage.

  5. Remove the white chocolate matcha cups from the freezer and scoop a little peanut butter into the center of each cup. Try not to get the peanut butter too close to the edges.

  6. Evenly divided the rest of the white chocolate matcha mix between each muffin cup, covering the peanut butter. Once all liners are filled, gently tap the tin on the counter top to even out the chocolate. Place the muffin tin back in the freezer for 5 minutes to allow the chocolate to harden.

Makes 12 mini peanut butter cups.

IMG_2096-Edit.jpg

Vegan Banana Pudding Milkshake

IMG_2112-Edit@0,25x.jpg

If I have not made my affection for vegan banana pudding clear by now, then I don’t what else I could do to drive it home.

It’s my favorite dessert! So since it is getting warmer outside, I decided a banana pudding milkshake was in order! Creamy vanilla ice cream, delicious bananas, vanilla wafers, and the best aquafaba meringue on top!

We often make our own vanilla wafers for this recipe unless I can find a vegan version already premade. But the recipe to make your own is really pretty easy..and they are super tasty. So worth the work in my opinion! We went ahead and linked the recipe we make in the ingredients!

And now I can’t honestly say if regular banana pudding, or this banana pudding milkshake is my favorite dessert. But hey, nobody has to choose, right? We can just enjoy them both with equal affection!


INGREDIENTS:

  • 1/2 pint dairy free vegan vanilla ice cream

  • 2 frozen bananas, sliced

  • 5-7 vegan vanilla wafers ( store bought or homemade)

  • 1/2 to 3/4 cups plant based milk

  • 2 cups sweet aquafaba whip ( meringue)


INSTRUCTIONS:

  1. Prepare aquafaba whip according to directions. The leftover whip will store well in the fridge, and can be rewhipped for later use.

  2. Add the bananas, ice cream, and milk to a high speed blender. I normally freeze my bananas in the peel once they become over ripe. They will peel easily if you just take them out of the freezer for minute. They will also slice pretty easily even when frozen. Blend until completely smooth. Add the cookies and blend for another minute.

  3. For the Meringue: You can put the aquafaba whip into a piping bag with a large star shaped tip, and pipe onto a piece of parchment paper placed on a baking sheet, into two mounds. You can also just scoop out two mounds of whip onto the parchment paper if you dont want to pipe it.

  4. Turn your oven to broil. Once the coils are bright red place the baking sheet with the aquafaba into the oven. Do not take your eyes off of the oven. The aquafaba meringue will brown in just a few seconds and will burn VERY quickly. You just want the tips to brown then remove from the oven.

  5. Divide the shake between 2 glasses. Using a spatula, carefully scoop up the mounds of meringue and place them on top of the shakes. Garnish with more sliced bananas and vanilla wafer cookies if you like.

Serving size is 2 regular sized shake glasses. You can always divide the shake into 4 smaller shakes. If so, just make 4, 1/2 cup sized mounds of aquafaba meringue.


If you liked this recipe, you might like these:

Southern Vegan Banana Pudding

Vegan Banana Pudding Pancakes

If I have not made my affection for vegan banana pudding clear by now, then I don’t what else I could do to drive it home. It’s my favorite dessert! So since it is getting warmer outside, I decided a banana pudding milk shake was in order! Creamy va…

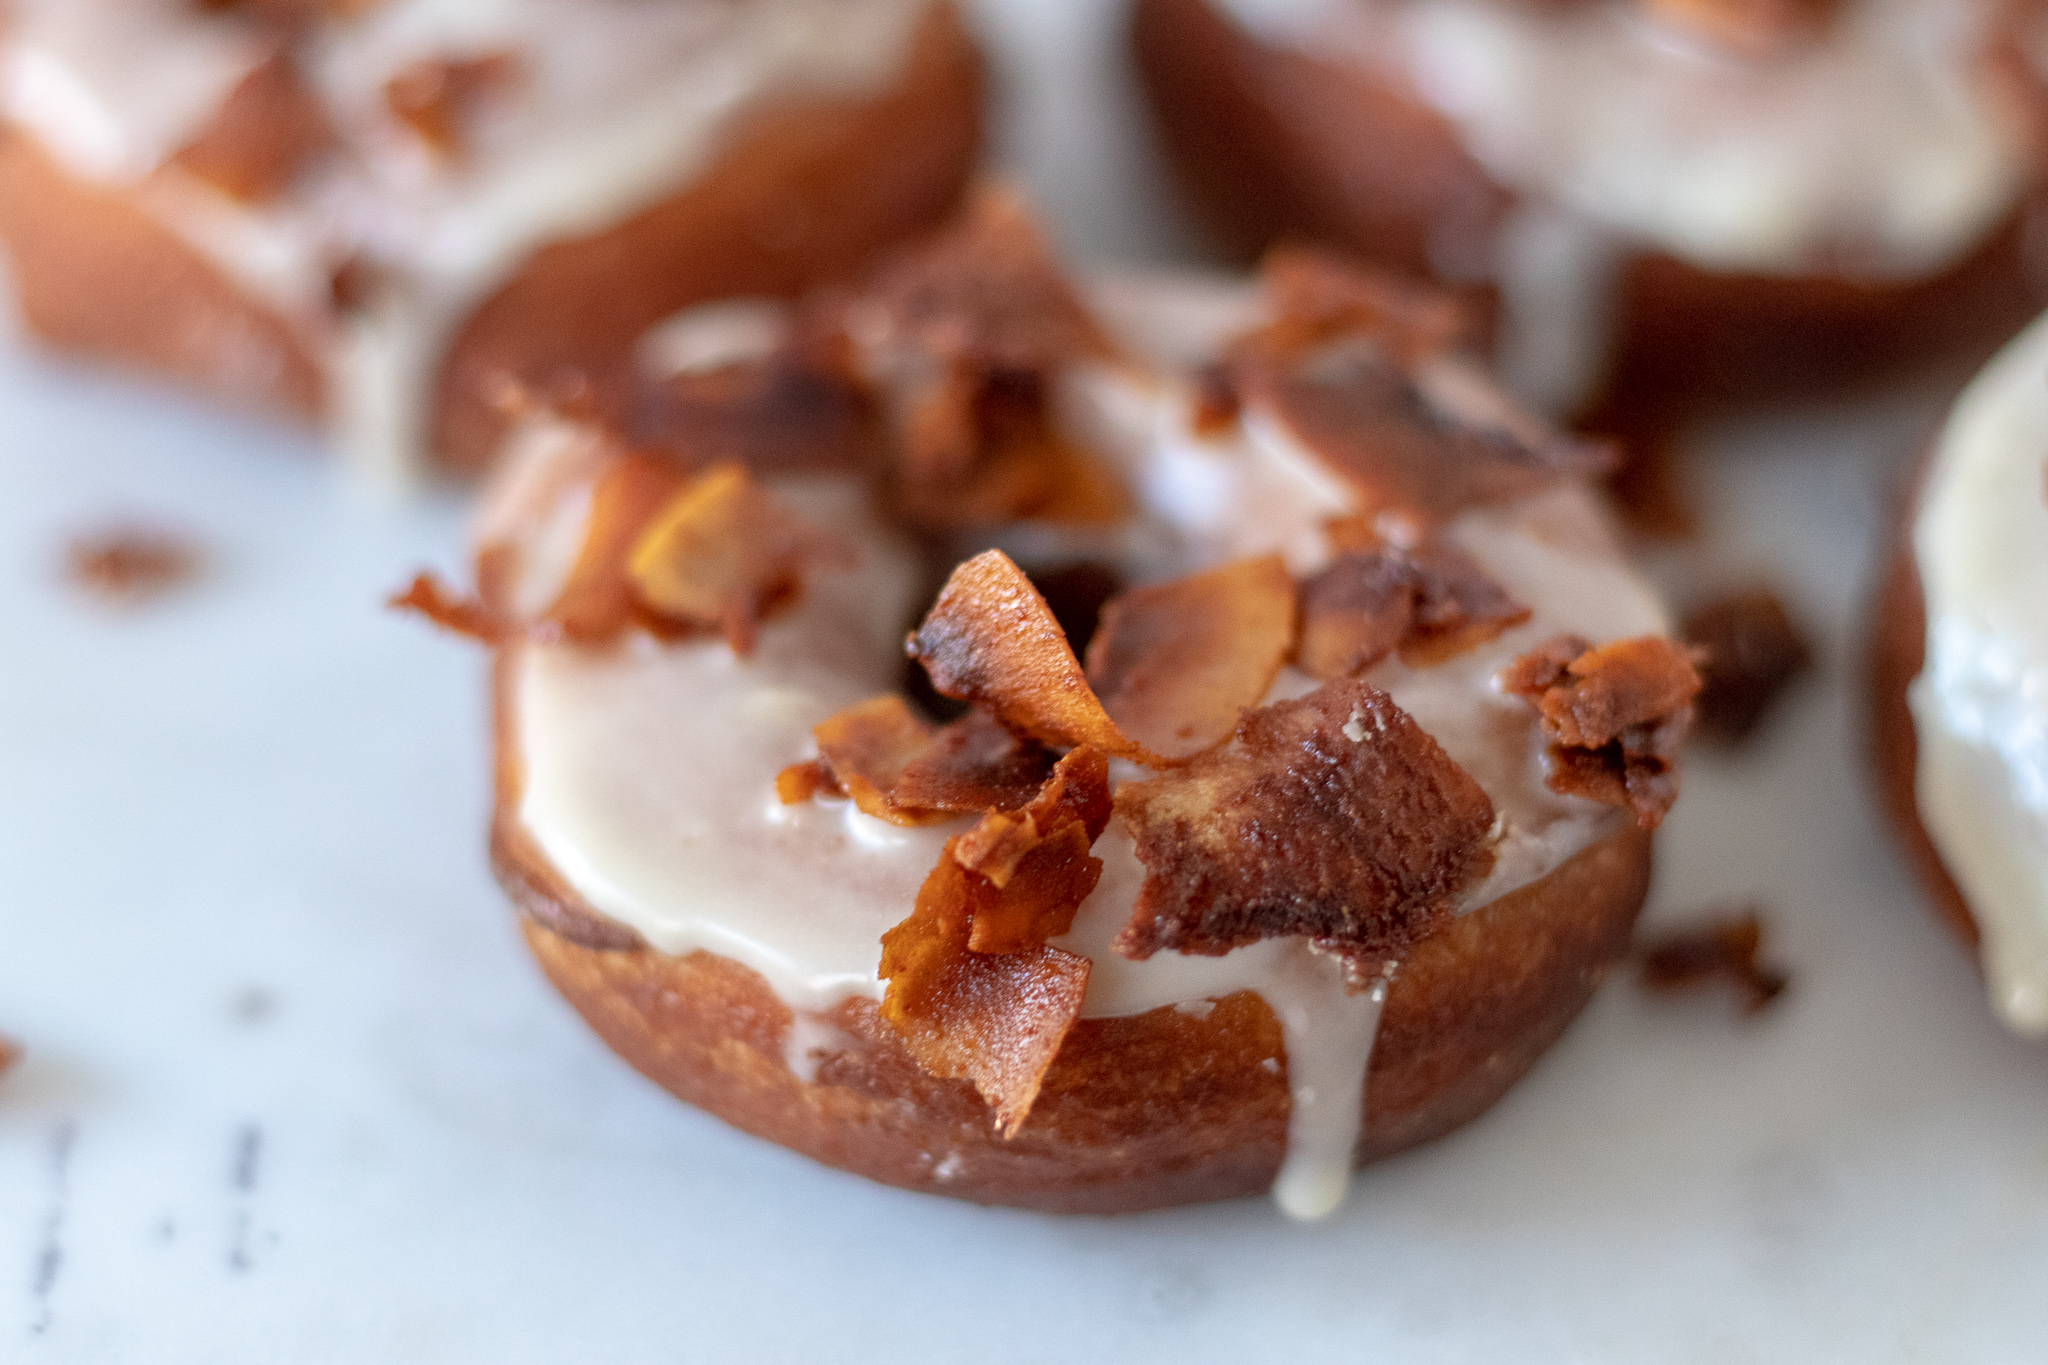
Vegan Maple Bacon Yeast Donuts

IMG_1847.jpg

INGREDIENTS:

The Donuts

  • 4 cups all purpose flour

  • 3/4 cups aquafaba

  • 1/2 cup plus 2 tablespoons melted vegan butter

  • 1/4 cup sugar

  • 2 and 1/4 teaspoon dry active yeast

  • 1 cup plus 2 tablespoons plant based milk

  • 1/2 teaspoon salt

  • 2-3 cups of oil for frying, I use grapeseed or peanut oil, but you could use whatever oil you normally fry with

The Glaze

  • 1 1/2 cups powdered sugar

  • 1/4 cup maple syrup

  • 1 teaspoon vanilla extract

  • a few splashes of plant based milk

  • Vegan coconut bacon

COOKING INSTRUCTIONS: 

  1. Heat milk in microwave for 30 - 45 seconds. You want it warm, but not boiling hot.

  2. Add the warm milk, yeast, and sugar to the bowl of your stand mixer. If you do not have a stand mixer, add the contents to a large bowl. Let sit for 5 minutes to activate the yeast.

  3. After 5 minutes add the aquafaba, and melted butter to the mix. Next add the flour, and salt, and mix for 5 minutes on medium speed if using the stand mixer. If not using a stand mixer, then mix the ingredients together well in a bowl, then transfer to a floured counter top, and kneed the dough by hand for 5 minutes. The consistency of the dough should be soft, but not sticky.

  4. After the dough has been kneaded, place it in a lightly greased bowl and cover with plastic wrap. Pop it in the oven. You are NOT turning the oven on, just leaving it there to rise. If your oven has a dough proof setting you can turn that on. Leave dough to rise for one hour, or until it has doubled in size.

  5. Once the dough has finished rising, transfer to a lightly floured countertop. I like to divide the dough in half and work it in two batches. It makes it easier to roll out. Roll out one half of the dough to about 1/4 inch thick. Using a 3 inch circle biscuit or cookie cutter (or donut cutter if you have one) begin cutting circles. You will need to find something small to cut the center out with. We used the lid to our vanilla extract. Roll back out the scrap dough and continue cutting. Repeat with other half of dough. You should have a total of 2 dozen donuts.

  6. Place donuts on cookies sheets, and let rest for about 15 - 20 minutes. They will become bigger as they rest.

  7. While they are resting, heat 2 - 3 inches of oil in a deep skillet or medium sized pot.

  8. Once oil is hot, begin adding the donuts to the oil, 2 or 3 at a time. Fry the donuts for about one minute on each side. If you don't have enough oil in the pan, and they are hitting the bottom, they will easily burn. So make sure to use enough oil!

  9. Allow donuts to cool on a wire cooling rack, placed on top of a paper-towel-lined cookie sheet.

  10. Once all donuts are done frying, mix all of the ingredients for the glaze. If you find the glaze too thick, you can always thin it with some more milk.

  11. Dip one side of the donut in the glaze and place back on the wire rack to allow the excess glaze to drip off. Sprinkle with coconut bacon while glaze is still wet

  12. It will only take a few minutes for the glaze to set, and for you to be stuffing your face with delicious glazed donut perfection!

Yields two dozen donuts

If you like this recipe, try these:

Vegan Glazed Yeast Donuts

Vegan Jelly Filled Donuts

IMG_1807.jpg

Vegan Apricot Hamantaschen

IMG_1569.jpg

Hamantaschen cookies are typically baked durning the Jewish holiday, Purim.

These tasty little bites can be filled with an array of fillings, savory, or sweet, but often are filled with apricot jam.

Our apricot jam recipe is so easy and the perfect filling for these classic vegan hamantaschen. I make it with dried apricots and it is good on toast as well.

Also, you don’t have to celebrate Purim to enjoy these cookies. These tasty, sweet treats can be enjoyed any time of year!

And if you are not a fan of apricot jam, use your imagination and fill them with anything you like from jam, to chocolate, to vegan cheese!


INGREDIENTS:

The Dough

  • 3/4 cups vegan butter, room temperature

  • 2/3 cups sugar

  • 2 3/4 cups all purpose flour

  • 1 egg replacement, we used Bobs, you can use flax but it will leave dark flecks in the dough

  • 1 teaspoon orange or lemon zest (optional)

  • 1/2 teaspoon salt

  • 1 teaspoon vanilla extract

  • 1-2 tablespoons water

  • Apricot Jam


INSTRUCTIONS:

  1. In large bowl, cream together the sugar and butter until light and fluffy.

  2. Next, mix in the zest and egg replacer with the butter and sugar.

  3. Finally add the flour and the salt, and mix until a soft dough forms. If the dough seems crumbly, add in a tablespoon or two of water.

  4. Knead the dough on a lightly floured counter top for a few minutes. You do not want to over knead the dough, you just want to make sure all of the ingredients and well incorporated.

  5. Wrap the dough in plastic wrap and chill for 2-3 hours in the fridge. The dough is really soft and needs to be pretty cold to roll out.

  6. Once dough is ready, roll it out on a large, clean, floured surface. I like to split my dough in half and only roll out one half at a time, leaving the other half in the fridge so it does not soften back up. I find it easier to manage. Roll the dough out to around 1/8 of an inch thick.

  7. preheat oven to 350 degrees

  8. Using a 3 inch circle cookie cutter or biscuit cutter (or the rim of a small glass) cut circle in dough. Carefully transfer the circles to a parchment paper lined cookie sheet. Take about a teaspoon of apricot jam and place in the center of the circle.

  9. Form the cookie into a triangle by folding in the top of the circle and pinching to a point. Fold up the bottom half of the circle and fold the sides over the bottom. Lightly press the corners together or you can pinch them like the top. Just make sure all corners are sealed well so the triangles do not come open while baking. Continue with remaining dough, leaving about an inch of space between each cookie.

  10. Bake cookies for about 20 minutes. Once cookies are done, transfer to a wire rack to cool.

    Yields about 2 and 1/2 dozen cookies

    If you liked this recipe, try these:

    Savory Vegan Goat Cheese and Tomato Hamantaschen

    Easy Apricot Jam


IMG_1561.jpg

Vegan Banana Pudding Pancakes

IMG_1696.jpg

If you are even remotely southern, you have probably had classic banana pudding in your lifetime.

Sweet vanilla pudding, sliced bananas, vanilla wafter cookies, topped with the most perfect, light and fluffy, golden brown peeked meringue!

It’s a work of art and a thing of beauty. I dream about banana pudding at night. So what is one to do when they can’t wait for dessert? You turn your favorite dessert into breakfast, obviously!

So may I introduce you to the vegan banana pudding pancakes! Perfectly fluffy pancakes, vanilla pudding, bananas, crushed vegan vanilla wafers. and sweet aquafaba meringue! I can not think of a better way to start my day than with these pancakes!


INGREDIENTS:

For the pudding:

  • 3 1/2 cups diary free milk ( we used almond)

  • 1/4 cup tapioca or corn starch

  • 3/4 cups sugar

  • 1 teaspoon vanilla extract

  • pinch of salt

For the Pancakes:

  • 2 1/2 cups all purpose flour

  • 4 teaspoons baking powder

  • 1/2 teaspoon salt

  • 1 teaspoon vanila extract

  • 2 tablespoons melted butter

  • 2 tablespoons sugar

  • 2 1/2 cups non dairy milk


Instructions:

  1. Prepare the aquafaba meringue according to instructions and set aside

  2. Add the ingredients for the pudding to a medium/large sized pot. Whisk in the starch so there are no lumps, and heat the mixture over medium heat. Continue to stir the mixture for about 5 minutes or until it has thickened to thin pudding consistency. You don’t want the pudding too thick because you want to be able to drizzle it over the pancakes. Once pudding has thickened, remove from stove top and set aside.

  3. Whisk dry pancake ingredients together. Add in the wet ingredients and mix until there are no lumps.

  4. Heat a large skillet or griddle over medium heat. Add a teaspoon of butter or some spray oil to the pan. Once the pan is nice and hot, scoop out pancake batter using a 1/4 cup measuring cup. Do not over crowed the pan. When tiny bubbles form and pop in the batter, the pancakes are ready to flip. If you notice the pancakes are too dark or beginning to burn, reduce the heat on your stove. Repeat with remaining pancake batter.

  5. On a baking sheet, make stacks of pancakes 3-4 high. If you want you can spread a little pudding between each pancake in the stack. I think it makes them extra yummy, but you can also just wait and drizzle it on at the end. Scoop a large dollop of sweet aquafaba whip on top of each stack. Set oven to broil. Once the coils are red in the oven, place the pan inside and DO NOT TAKE YOUR EYES OFF OF THE PANCAKES FOR EVEN A SECOND!!!! You just want the meringue to brown at the peeks. it will go from beautiful golden brown, to inedible black char in a matter of seconds, so once the aquafaba has started to brown, remove the pan from the oven.

  6. Using a spatula, transfer pancakes to a plate. Drizzle each pancake stack with vanilla pudding, and top with sliced bananas and crushed cookies.

Serves 4-6


Sweet Aquafaba Whip (Meringue)

IMG_1495.jpg

Aquafaba is a magical thing! Whatever genius decided chickpea liquid could be whipped up into a light, perfect, fluffy, could needs a trophy, hug, high five, and a million dollars as far as I am concerned.

Original aquafaba is used often as an egg replacer in baked goods.. This versions has a good bit of sugar in it, so it whips up to a sweet, glossy cloud, that can be used in place of whip cream, or as a perfect vegan meringue.

Just like meringue, this aquafaba will brown beautiful in the oven, and works great for pies, cakes, banana pudding, or anything else that would need a vegan meringue.

So lets just give a big ol HECK YES to the brain that realized this magic, and may all of your pies be covered in the most glorious vegan meringue from this day forward.


INGREDIENTS:

  • 1 can of chickpea liquid, or liquid from any white bean

  • 3/4 cups sugar

  • 1/4 teaspoon cream of tartar, or salt (this stabilizes the whip)


INSTRUCTIONS:

  1. Add chickpea liquid, sugar, and cream or tarter or salt to a stand mixer or a large bowl if you are using an electric hand mixer.

  2. Beat on high for about 10 minutes. I know this seems like a long time, and it will seem like the cream/meringue is not going to come together, but it will. You will know its done when stiff peeks form, and it becomes kind of shiny, and glossy.

  3. You can use the aquafaba as a whip cream as is, or use it as meringue. It will brown very nicely in the oven, and honestly most people never know it is not egg meringue.

  4. You can refrigerate any lefterovers and use with 2-3 days. You will just have to rebeat the whip because it will start to turn back to its liquid form. But don’t worry, it will rewhip to its original tasty glory in a few minutes.

Vegan Chocolate Mint Cookie Cake

IMG_1615.jpg

Raise your hand if you love chocolate mint everything!!

If you raised your hand then I have just the cake for you! Butter cake, chocolate frosting, mint frosting, and chocolate mint sandwich cookies between every layer of cake!

This is one of those cakes that dreams are made of! This vegan mint chocolate cookie cake may seem a little more ambitious than some of our other cake recipes, but its actually pretty easy to make. It just takes a little time, but I promise it will be totally worth it!

The actual cake recipe was adapted from the genius Gretchen Price’s cookbook, Modern Vegan Baking. This book is basically the vegan baking bible as far as we are concerned in this house. We actually came to know Gretchen online after we bought and obsessed over this book. As it turns out she is as amazing in real life as I has imagined through her book! GO BUY HER BOOK right now!!!!! And poke around her blog. You will not be disappointed in any recipe you ever make from her.

We made mad a few changes and additions to her easy vanilla cake recipe based on what we had on hand and the fact that we wanted a minty cake, not vanilla! But if you want the vanilla version, and her actual recipe since we changed a few things, I repeat, go buy her book!!! We use our copy ALLLLL THE TIME!

This cake is a bit ambitious. You can always frost the entire cake in solid green if you don’t want to dye the frosting various shades. It will taste just as good! If you have never used a star tip, squeeze the piping bag in small little burst making a little shell like shape while going around the cake.

This take practice, so maybe try on a paper towel before starting on the cake. Youtube is full of tutorials for frosting cakes. Try the video we linked or search “star tip shell boarder”, or “using a star tip.” You can always just flat frost the cake, or make little waves with a frosting spatula or butter knife to give it some texture. It will still be a pretty and delicious cake!

So if you’re looking for the perfect spring or St. Patricks Day cake, here it is!! I hope you love it as much as we do!


INGREDIENTS:

  • 1 large pack of mint sandwich cookies

  • 1 1/2 cups oat milk, you can use ANY non dairy milk, but we prefer oat for baking

  • 3 tablespoons apple cider vinegar

  • 1 cup vegan butter, melted

  • 1 3/4 cups sugar

  • 1/2 teaspoon salt

  • 1 1/2 teaspoons mint extract

  • 3 cups all purpose flour

  • 2 teaspoons baking soda

Chocolate butter cream frosting:

  • 1/4 cup vegan butter

  • 1/4 cup shortening

  • 1/4 cup cocoa powder

  • 1/2 teaspoon vanilla extract

  • 2 cups powdered sugar

  • splash of non dairy milk

Mint Buttercream Frosting:

  • 1/2 cup vegan butter

  • 1/2 cup vegan shortening

  • 3 3/4 cups powdered sugar

  • 2 teaspoons mint extract

  • splash of non dairy milk

  • green food dye


INSTRUCTIONS:

preheat oven to 350 degrees

  1. Sift baking soda, flour, and salt into a small bowl.

  2. In a cup combine milk and vinegar. Let the mixture sit for a few minutes until the milk begins to curdled.

  3. In a large bowl cream the butter, sugar, and mint extract with an electric mixer. Pour the milk into the bowl and mix. Next, add the flour mixture and mix until the batter is smooth.

  4. Prepare two 8 inch cake pans by rubbing a light layer of oil around the pan. Add a few teaspoons of flour to the pans and shake it around to coat, shaking out the excess flour. Divide batter evenly between pans.

  5. Bake for 40 minutes or until a tooth pick inserted into the middle comes out clean. Allow cakes to cool completely before removing from the pans.

  6. While cakes are cooling, prepare the frosting. First combine all ingredients for the chocolate frosting together in a large bowl and mix with an electric mixer until smooth. Add just enough milk to get the desired consistency. You can also put all of the ingredients into your stand mixer and mix until smooth. Set frosting aside.

  7. Repeat the same process with the ingredients for the mint frosting. If you want to frost the cake in an ombre style like in the picture, divide prepared frosting into 4 bowls. Put around 1/3 cup of the mint frosting into each of three smaller bowls, with the remaining frosting in the 4th bowl. One bowl of frosting will stay white, the other three will be gradual shades of green, the darkest green being the bowl with the most frosting. How much dye you use in each bowl is dependent on what type dye you are using. For example, gel dyes yield a stronger pigment than your average grocery store liquid dye. You will just need to add a drop or two more of dye to each bowl to achieve the gradual color difference.

  8. Crush up about half of the sandwich cookies and set aside.

  9. Carefully remove the cakes from the pans. Normally turning the pans upside down onto a flat surface and tapping the bottom works, as long as the pan was well prepared. Divide each cooled cake in half. A sharp serrated knife normally works well for this. Begin frosting the cakes by coating one layer in 1/2 of the chocolate frosting and sprinkling with 1/3 of the crushed cookies. Stack a second cake layer on top and frost with some of the darkest green frosting. Sprinkle with crushed cookies. Top with another layer of cake and frost with the remaining chocolate frosting and cover with remaining crushed cookies. Place final layer of cake on top. Take about a 1/4 cup scoop of the darkest green frosting and crumb coat the entire cake. This is just a SUPER paper thin layer of frosting that forms a barrier and helps keep the crumbs from getting into your finished frosting. I like to put the cake in the fridge for a bit to let the crumb coat harden before I decorate the cake. It just makes decorating the cake easier.

  10. Fill a piping bag, or a zip lock bag with a corner cut out, with a small star frosting tip. Add the white frosting first, and go around the cake in 2 rows, starting at the bottom. Repeat this process with the remaining colors lightest to darkest, circling around to the top of the cake, ending with the darkest green until the entire cake is covered.

  11. Cut remaining chocolate cookies in half and decorate the top of the cake. Store cake covered at room temperature.


If you liked this recipe, try these!

Vegan Chocolate Peanut Butter Dream Cake

Vegan Eggnog Cake

IMG_1636.jpg

Savory Vegan Goat Cheese and Tomato Hamantaschen

IMG_1557.jpg

Meet the unsung hero of the Hamantaschen cookie! The savory Hamantaschen!

Hamantaschen are made to celebrate the Jewish holiday of Purim, which celebrates the bravery of Esther against the evil, Haman. Although the cookies are typically sweet and filled with things like poppy seeds, jam, or chocolate, I decided this year to try a savory Hamantaschen using our alomond herb goat cheese, rosemary, and tomato.

We left the dough a little sweet with a hint of lemon, but y'all, it works! Nobody in my house was booing these cookies.

They are delicious!

I did have some trouble at first convincing some friends to try these. After all, who makes savory Hamantaschen? But once I talked them into it, they were pleasantly surprised!

So if you are ready to change up your regular Hamantaschen game, give these a go. Even if you have never heard of a Hamantaschen cookie, you don’t have to celebrate Purim to bake up a batch of these tasty treats!

Vegan Hamantaschen for everyone!


INGREDEINTS:

The Dough

  • 3/4 cups vegan butter, room temperature

  • 1/3 cup sugar

  • 2 1/2 cups all purpose flour

  • 1 egg replacement, we used Bobs

  • 1 teaspoon lemon zest

  • 1/2 teaspoon salt

  • 1-2 tablespoons water

The Filling


INSTRUCITONS:

  1. In large bowl, cream together the sugar and butter until light and fluffy

  2. Next , mix in the lemon zest and egg replacer with the butter and sugar.

  3. Finally add the flour and the salt, and mix until a soft dough forms. If the dough seems crumbly, add in a tablespoon or two of water.

  4. Knead the dough on a lightly floured counter top for a few minutes. You do not want to over knead the dough, you just want to make sure all of the ingredients and well incorporated.

  5. Wrap the dough in plastic wrap and chill for 2-3 hours in the fridge. The dough is really soft and needs to be pretty cold to roll out.

  6. Once dough is ready, roll it out on a large, clean, floured surface. I like to split my dough in half and only roll out one half at a time, leaving the other half in the fridge so it does not soften back up. I find it easier to manage. Roll the dough out to around 1/8 of an inch thick.

  7. preheat oven to 350 degrees

  8. Using a 3 inch circle cookie cutter or biscuit cutter (or the rim of a small glass) cut circle in dough. Carefully transfer the circles to a parchment paper lined cookie sheet. Take about a 1/3 teaspoon of the almond herb goat cheese and place in the center of the circle. Top the cheese with a ring of cherry tomato and a few springs of fresh rosemary.

  9. Form the cookie into a triangle by pinching the top to a point. Fold up the bottom half of the circle, and pinch the two bottom corners together all well. Make sure all three corners are pinched well so the triangles do not come open while baking. Continue with remaining dough, leaving about an inch of space between each cookie.

  10. Bake cookies for about 20 minutes. Once cookies are done, transfer to a wire rack to cool.

    Yields about 2 and 1/2 dozen cookies


IMG_1551.jpg

Vegan Valentine's Chocolates (3 ways)

IMG_1168.jpg

I am pretty sure in my lifetime I have eaten more heart shaped boxes of chocolates than I care to share with you.

I LOVE cream filled, caramel filled, nugget filled, nut filled, jelly filled, chocolates. Seriously, my husband will attest to this fact, and he will also tell you I am the kind of person who will take one bite out of each one, like a jerk, so that they are from the point on property of ME, and so no one else will want them (I’m not proud of this, but it is what it is.) You know what I am talking about. You take a little bite out of one and realize its not your fave and move on, but once all the good ones are gone you will go back to those less tasty chocolates, out of desperation.

But, what if you made your own chocolates full of your most favorite flavors, AND they were vegan! Well my friends it’s actually really simple! You just need a candy mold, some vegan chocolate, and a few things for the fillings.

I wish I could take full credit for these sweet little master pieces, but it is actually our 13 year old, genius of a baker daughter ,Peyton, who brought us to this magical place of homemade chocolates! I will however take full credit for eating more of these candies than anyone else in our house.

So this Valentine’s Day (or any ol random day) whip up a batch of these for someone you love, like, simply tolerate, or even for yourself.

And if you don’t want to make them yourself, get one of your kids to do it while you watch reruns of the Office with your feet up, sipping on some coffee (I’m just daydreaming at this point) xoxo


Ingredients:

You will need candy molds for this recipe. You can use any candy molds you like, but we have found the hard molded plastic molds work better than the silicon. The silicon molds tend to cause the candies to crack when you attempt to remove them from the mold.

  • 1 cup chopped dark vegan chocolate or vegan chocolate chips

  • 1 teaspoon coconut oil

Strawberry cream filling:

  • 1 1/2 cups powdered sugar

  • 1 large strawberry, mashed up

  • 2 tablespoons softened vegan butter

  • 2 tablespoons light corn syrup

Maple cream filling:

  • 1 3/4 cups powdered sugar

  • 2 tablespoons maple syrup

  • 2 tablespoons softened vegan butter

  • 2 tablespoons light corn syrup

Carmel filling:

  • 2/3 cups white sugar

  • 3 tablespoons water

  • 1 tablespoon corn syrup

  • 7 tablespoons oat milk or canned coconut milk (these milks are thick and work well for caramel)

  • 1 tablespoon of vegan butter

  • pinch of salt

Instructions:

  1. Start buy getting set up: You will need a nice big piece of parchment paper or a silicone mat. Line up your candy molds next to the parchment paper or mat.

  2. Place the chocolate and coconut oil in a microwave safe dish. Microwave chocolate for 30 seconds at time, stirring each time, until all of the chocolate has melted.

  3. Coating the molds: Pour a small amount of melted chocolate into each mold and spread the chocolate up the sides. Tap the molds on the counter to remove any air bubbles, then turn the molds upside down onto the parchment paper so the extra chocolate drips out (see pictures above.) Pop the molds in the fridge for 10 - 15 minutes or until the chocolate has set. Prepare filings while molds set.

  4. For the strawberry and maple filling: Mix all of the ingredients for either filing in a bowl until nice and smooth, and there are not more powdered sugar lumps. If making strawberry, first mash the fresh strawberry with a fork in the bowl before adding the other ingredients.

  5. For the caramel filling: In a small sauce pan add white sugar, corn syrup, water, and stir. Place pan on the stove top on medium heat. DO NOT STIR THE MIXTURE ONCE IT IS ON THE STOVE. Allow the mixture to simmer until golden brown. Once the mixture has reached golden brown, remove from the heat and carefully stir in the butter and milk. The mixture tends to bubble up a lot once you add the butter and milk, so be careful not to burn yourself. Once everything is well combined, pour caramel into a bowl and allow to cool.

  6. To fill the molds: Pipe or scoop filling into the centers of the chocolate coated molds, leaving enough room around the sides and the top to cover the candies in chocolate. Reheat the chocolate until it has melted. Pour melted chocolate over the filling all the way to the tops of the molds. Once all of the molds are covered in chocolate, run a cake scraper, or butter knife across the top of the candy tray to remove the excess chocolate. Pop chocolates back in the fridge until the chocolate is hard and set. Turn over your mold and tap to remove the chocolate (if using the hard mold) or if using a silicon mold, gently peel the mold away from the candies and remove.

  7. Store leftover chocolates in the fridge. (They get a bit melty if they sit out too long and its warm inside your house, so I always just keep them in the fridge)


This recipe will fill 2 - 3 molds depending on the size of the mold. There is normally leftover filling which we refrigerate for a later batch. The cream fillings will keep in the fridge for several weeks. You may need to melt more chocolate depending on how many candies you are making, as well.

IMG_1058.jpg

Vegan Chocolate Peanut Butter Dream Cake

wide.jpg

Chocolate and peanut butter are a classic dessert combo!

I would have sworn when I was a kid that I could have live off of chocolate peanut butter cups.

Now as an adult, I would swear I could live off of this cake.

Creamy peanut butter frosting on top of the perfect vegan chocolate cake. It’s everything you think it would be and probably more. We added a pinch of almond extract to the frosting for an extra nutty kick, and topped the cake with salty roasted peanuts, and shaved vegan chocolate.

Vegan baking is no harder than regular baking, it is all about learning how to replace eggs and dairy. I like to use oat milk when baking because it gives vegan bakes a better brown! I like to also use aquafaba to replace eggs, and sometimes powdered egg replacer or flax eggs. It is all about leaving how to swap a few things out and you will get a cake that is just as good as the non vegan version if not better!!!

We use WHIPPED aquafaba in this cake to replace the eggs. We are measuring the product AFTER it has been whipped so keep this in mind. You do not need 1 1/2 cups of chickpea liquid! You will have leftovers of the whip and it will keep in the fridge and whip back up later for later use! Save the chickpeas and add them to a salad, roast them as a snack, or mash them into hummus!!!

. This cake is a sweet, salty, chocolatey, peanut buttery, vegan dream that no one will ever even guess is vegan!!!!


Ingredients:

  • 2 cups all purpose flour

  • 2 cups sugar

  • 3/4 cup dark cocoa powder

  • 1 1/2 cups aquafaba (chickpea liquid that has been whipped with cream of tarter resembling whipped egg whites)

  • 1 teaspoon baking soda

  • 3 teaspoons baking powder

  • 1 teaspoons salt

  • 1/2 cup neutral oil (I use Grape seed oil)

  • 1 cup brewed coffee

  • 1 cup plant based milk (I like oat milk for baking) plus 1 teaspoon apple cider vinegar

  • 1 teaspoon vanilla extract

Peanut Butter Frosting:

  • 1/2 cup vegan butter

  • 1/2 cup vegan shortening

  • 1/2 cup creamy peanut butter

  • 1 teaspoons vanilla extract

  • 1/2 teaspoon almond extract (optional)

  • 3 cup powdered sugar

  • pinch of salt

  • splash of plant based milk

  • Optional decorations: shaved chocolate, peanuts, chocolate bar pieces


Instructions:

Preheat oven to 350 degrees.

  1. In a large bowl, mix together flour, sugar, cocoa powder, baking powder, baking soda, and salt.

  2. In the bowl of your stand mixer, or another large bowl if using a hand mixer, add the milk, oil, brewed coffee, and vanilla. Slowly pour in the dry ingredients and mix until well combined. Once the batter is all mixed up, slowly fold in the whipped aquafaba using a rubber spatula, just until incorporated. Do not over mix, this deflates the aquafaba, resulting in a less fluffy cake.

  3. Grease and lightly flour two eight inch cake pans and divide the batter evenly between them.

  4. Place the pans on the top rack of your oven and bake for 45 minutes to 1 hour, or until a tooth pick comes out clean when poked in the center of the cakes.

  5. Once cakes are finished baking, place them on a cooling rack to cool completely before frosting.

  6. To prepare the frosting, beat the butter, shortening, and peanut butter together in a stand mixer, or in a large bowl, using your electric hand mixer. Once the mixture is completely creamy, beat in the vanilla and almond extract. Slowly begin to beat in the powdered sugar, and mix until there are no more lumps. Add a tablespoon at a time of plant milk until the frosting is creamy and smooth, and a spreadable consistency. If you accidentally get it too thin, add a little more powdered sugar to thicken it back up.

  7. To even out each cake, take a large sharp knife, and carefully shave off a thin, even layer from the top of each cake. This will insure the cakes stack evenly. Add a few spoonfuls of icing to the top of one cake, and spread it evenly. Take the other cake and turn it upside down on top of the iced cake ( this way the top of your cake is perfectly smooth and flat.) Evenly cover the cake with the remaining frosting, using an icing spatula or butter knife if you do not have an icing spatula.

  8. If you want to decorate the cake, you can shave a vegan chocolate bar on a box grater, and press the shavings into the sides and top of the cake. Sprinkle roasted peanuts around the edge of the cake, and stack some chocolate bar squares in the middle.

  9. Store at room temperature in a covered container.

IMG_0733.jpg

The Prefect Vegan Peanut Butter Cookie

Peanut butter cookies are a classic and super simple to veganize! Soft and chewy, and sooooo yummy! You can just as easily use a different nut butter if you prefer, or if there is an allergy to peanuts. I often bake a double batch and freeze half, i…

Peanut butter cookies are a classic and super simple to veganize! Soft and chewy, and sooooo yummy! You can just as easily use a different nut butter if you prefer, or if there is an allergy to peanuts. I often bake a double batch and freeze half, in case I need a dessert for a party or gathering in a pinch. OR if I just really, really, NEED to eat a cookie and can’t wait for a batch to bake. No judgments here!!

Ingredients:

  • 1 cup vegan butter (I use Earth Balance)

  • 2-1/2 cup white all-purpose flour

  • 1 cup brown sugar, lightly packed

  • 1 cup white granulated sugar

  • 1 cup peanut butter

  • 1 tablespoon vanilla extract

  • 1 flax egg

  • 2 tablespoons plant based milk

  • 1 teaspoon baking soda

  • 1/2 teaspoon salt

Instructions:

preheat oven to 350 degrees

  1. In the bowl of your stand mixer, or a large bowl if you are using a hand mixer, cream butter with both sugars until light a fluffy.

  2. Beat in the flax eggs, peanut butter, vanilla, and plant based milk.

  3. Whisk together the flour, salt, and baking soda in a smaller bowl. Gradually add the flour mixture to the creamed mixture. Mix until just combined.

  4. Line a 2 baking sheets with parchment paper. Using a tablespoon or small cookie scoop, scoop out dough and roll into 1 inch balls. Using a fork, press into the cookies making a cross hatch design, helping to flatten them out.

  5. Bake for 8-10 minutes. Remove from oven and allow cookies to cool on the pan for a few minutes before transferring to a wire cooling rack.

Soft Vegan Gingerbread Cookies

Soft vegan gingerbread cookie

Soft vegan gingerbread cookie

What screams “HOLIDAYS!” more than gingerbread. These soft vegan ginger cookies are one of my favorite holiday treats. Serve these with a cup of hot coffee, or a glass of vegan egg nog, and you will have no problem getting right into the holiday spirit. Bake up some extra to gift to friends and family and help spread some holiday cheer this season!

Ingredients:

  • 3/4 cup vegan butter

  • 1 cup sugar

  • 1 Flax egg

  • 1/4 cup molasses

  • 2-1/4 cups all-purpose flour

  • 1 teaspoon baking soda

  • 2 teaspoons ground ginger

  • 1/4 teaspoon ground nutmeg

  • 3/4 teaspoon ground cinnamon

  • 1/4 teaspoon salt

  • additional sugar

Instructions:

preheat oven to 350 degrees

  1. In the bowl of your stand mixer, or a large bowl if using a hand mixer, cream butter and sugar until light and fluffy.

  2. Beat in the molasses and the flax egg until just combined. (I like to spray my measuring cup with some non stick spray before adding the molasses. This will help the molasses slide right out)

  3. In a smaller bowl whisk togerherr flour, baking soda, spices, and salt. Gradually add the dry mixture into the creamed mixture, and mix until all ingredients are combined.

  4. Scoop dough with a small cooke scoop or a spoon, and form 1 inch balls. Roll the balls in the additional sugar and place on a parchment lined baking sheet, a few inches apart. Lightly press down on the dough balls with your hands. Do not flatten them, just give them a little press.

  5. Bake cookies for 10-12 minutes. Allow cookies to cool for a few minutes before transferring to a wire cooling rack.

IMG_9859.jpg

Vegan Ranger Cookies

Growing up, ranger cookies were hands down my favorite treat. We would buy them from our local grocery store’s bakery. After growing up and moving away, I would still pop in a buy a pack when visiting my parents. Eventually we went vegan , and it fi…

Growing up, ranger cookies were hands down my favorite treat. We would buy them from our local grocery store’s bakery. After growing up and moving away, I would still pop in a buy a pack when visiting my parents. Eventually we went vegan , and it finally occurred to me to search for a recipe, and try to veganize my favorite cookie!. These taste just like the the ranger cookies I grew up eating. These cookies are chewy, and coconutty, with little crispy bits from the rice cereal. So if you have never had or even heard of a ranger cookie, bake up a batch. I think you might just love them as much as I do!

Ingredients:

  • 1 cup vegan butter

  • 1 cup sugar

  • 1 cup packed brown sugar

  • 2 flax eggs


  • 1 teaspoon vanilla extract

  • 2 cups all-purpose flour

  • 1 teaspoon baking soda

  • 1/2 teaspoon baking powder

  • 1/2 teaspoon salt

  • 2 cups quick-cooking oats

  • 2 cups crisp rice cereal

  • 1 cup unsweetened shredded coconut

Instructions:

preheat oven to 350 degrees

  1. In the bowl of your stand mixer, or a large bowl if you are using a hand mixer, cream butter with both sugars until it is light a fluffy.

  2. Beat in the flax eggs and vanilla.

  3. Whisk together the flour, salt, baking soda, and baking powder in a smaller bowl. Gradually add the flour mixture to the creamed mixture. Mix until just combined.

  4. Stir in the coconut, oats, and rice cereal.

  5. Line a 2 baking sheets with parchment paper. Using a tablespoon or small cookie scoop, scoop out dough onto cookie sheets, leaving a few inches between each scoop of dough.

  6. Bake for 8-10 minutes. Remove from oven and allow cookies for a few minutes on the pan before transferring them to a wire cooling rack.